How to use UTM_ID in Google Ads?
How to use UTM_ID to tag paid marketing campaign URLs and import the campaign data to Google Analytics.
Most of us are used to tagging campaign URLs with utm_source, utm_medium, and utm_campaign parameters. UTM parameters are helpful in figuring out how your campaign is performing.
But when you add multiple parameters including custom parameters to your campaigns, the tagging becomes very complicated. URLs also become long and clumsy. The perfect solution to this problem is using UTM_IDs to tag your campaign URLs.
UTM_ID is an alphanumeric value that summarizes data from all the UTM parameters, in the Campaign Data Import feature of Google Ads.
What is UTM_ID?
UTM_ID is a parameter appended to the campaign URLs, to collect all the relevant information about your visitors.
URLs tagged with UTM parameters look like this:
https://www.camptag.ai?utm_source=linkedin&utm_medium=social&utm_campaign=branding
URLs tagged with UTM_IDs look like this:
https://www.camptag.ai?utm_id=3453456
Here, the value ‘3453456’ stands for all those long UTM parameters listed in the first URL, making the URL shorter.
Benefits of using UTM_ID in Google Ads
Here's how UTM_ID can make life simpler for your Marketing, Adops and Analytics teams.
- It makes the URLs shorter. Hence, there is no need to use clumsy URL shorteners that can add redirects, and increase page load time to your campaign landing page URLs.
- UTM_IDs can reduce data entry errors. The mapping between UTM_IDs and parameters are done in excel sheets, where you can have data validation checks to ensure that there are no mistakes. Only the ID needs to be added to your actual campaign URLs, making it less error prone.
- This smart, little UTM_IDs help you hide the parameters you are tracking in your campaigns from your competitors, visitors, and general nosy parkers.
- You can track more parameters using UTM_IDs since there is no fear of the URLs becoming long and unmanageable. You just need to map these extra parameters as Custom Dimensions on Google Analytics for accurate tracking.
How to add UTM_ID to your Google Ad campaigns?
Step 1 – Tagging your Campaign URLs with UTM_ID
Adding a code to the end of your campaign URLs sounds simple enough. But remember that you must make sure they are not repeated, and also that they are mapped correctly to the parameter values.
https://www.camptag.ai?utm_id=3453456
Here the UTM_ID should be unique to a campaign. This tagging can be done in 3 different ways.
-
Manually tag each campaign URL with a unique code
Maintain a spreadsheet with UTM_IDs and corresponding parameter values. Increment the UTM_ID value by one for each new campaign, and copy paste the URLs into Google Ads.
-
Add campaign codes using analytics.js code to the landing page
Analytics.js is a JavaScript code that you add to the website
section to measure website visitor behavior. In order to add a utm_id to the landing page, add this code.// Create the tracker ga('create', 'UA-XXXX-Y', 'auto'); // Set UTM_ID directly ga('set', 'UTMId', '1234'); // Send the page view ga('send', 'pageview'); -
Use a plugin to add UTM_ID
This method can be helpful in case you are not using UTM parameters. Use analytics.js plugins to map custom parameters to values that can be mapped to Google Analytics.
Step 2 – Adding Custom Dimensions on Google Analytics
Standard URL parameters are utm_source, utm_medium, utm_campaign, utm_content, and utm_term. In addition to these, you can add Custom Dimensions to your campaign URLs.
These Custom Dimensions have to be defined in GA using the following steps:
- Manually tag each campaign URL with a unique code
- Select the Property you want
-
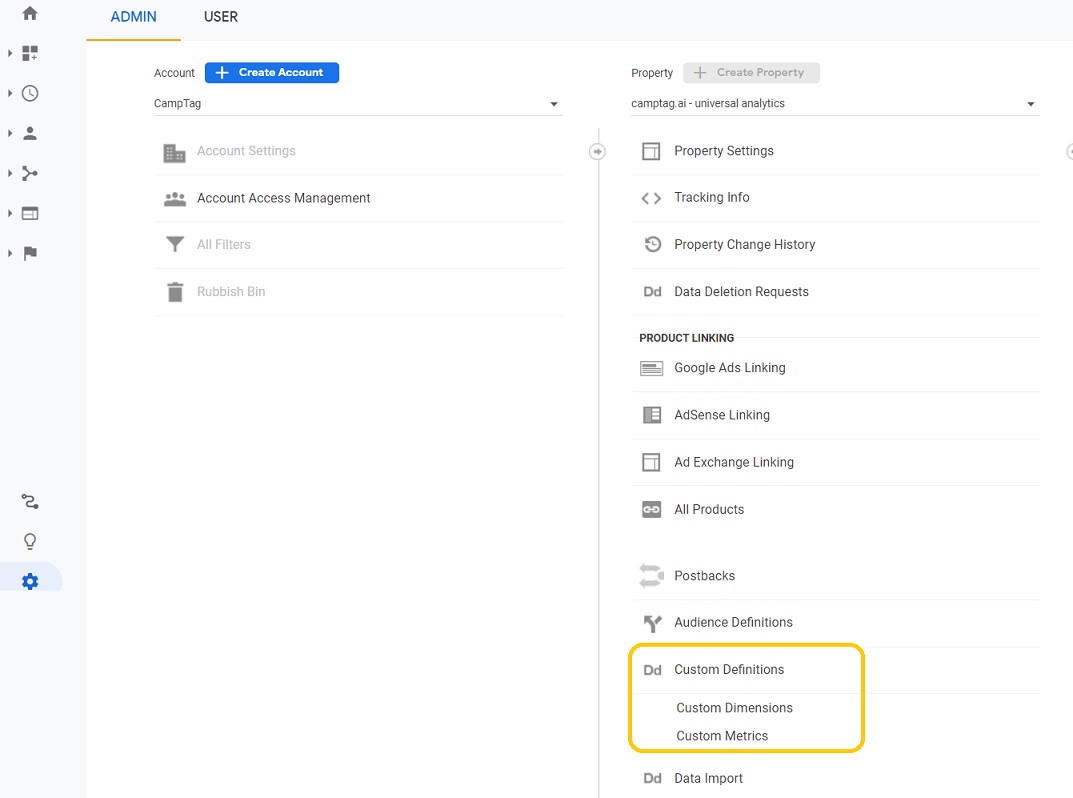
Go to Custom Definitions -> Custom Dimensions
-
Add a New Custom Dimension, and set the scope to Session.
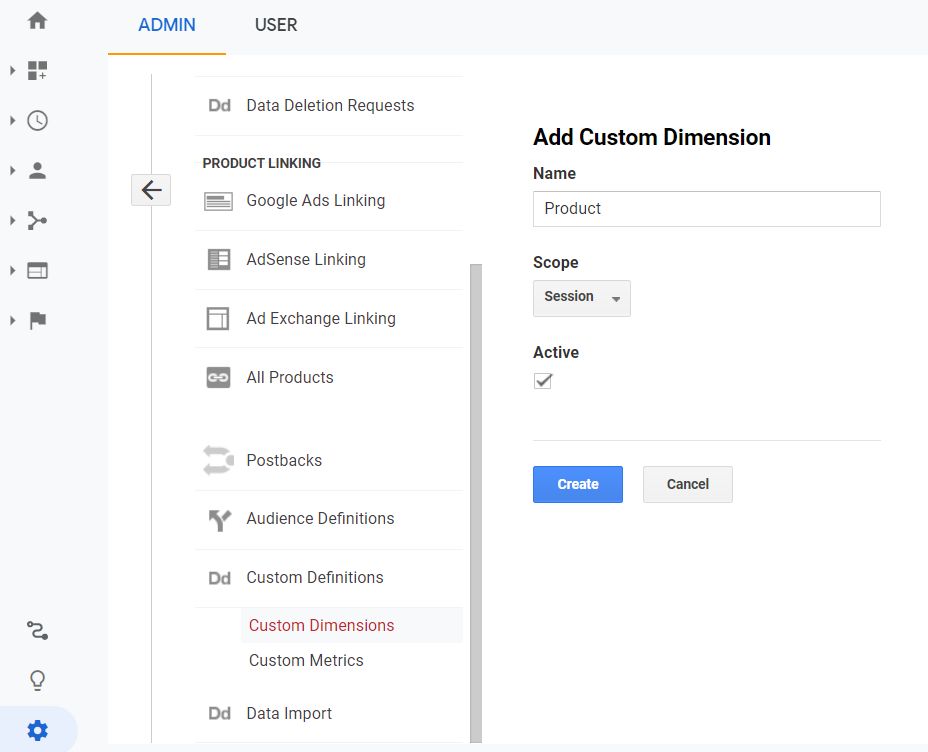
You can create up to 20 Custom Dimensions for the different parameters you want to track in the campaign URL. Remember that GA Custom Dimensions cannot be deleted, they can only be edited.
Step 3 – Creating a Data set
In order to import campaign data, you need to create a data set. Here are the steps to creating a data set that includes the custom dimensions you created earlier.
- Go to the Admin section
- Select the Property you want
- Select Data Import in the side menu
- Click on Create
- Under Data Set type, select ‘Campaign Data’ and click Continue
-
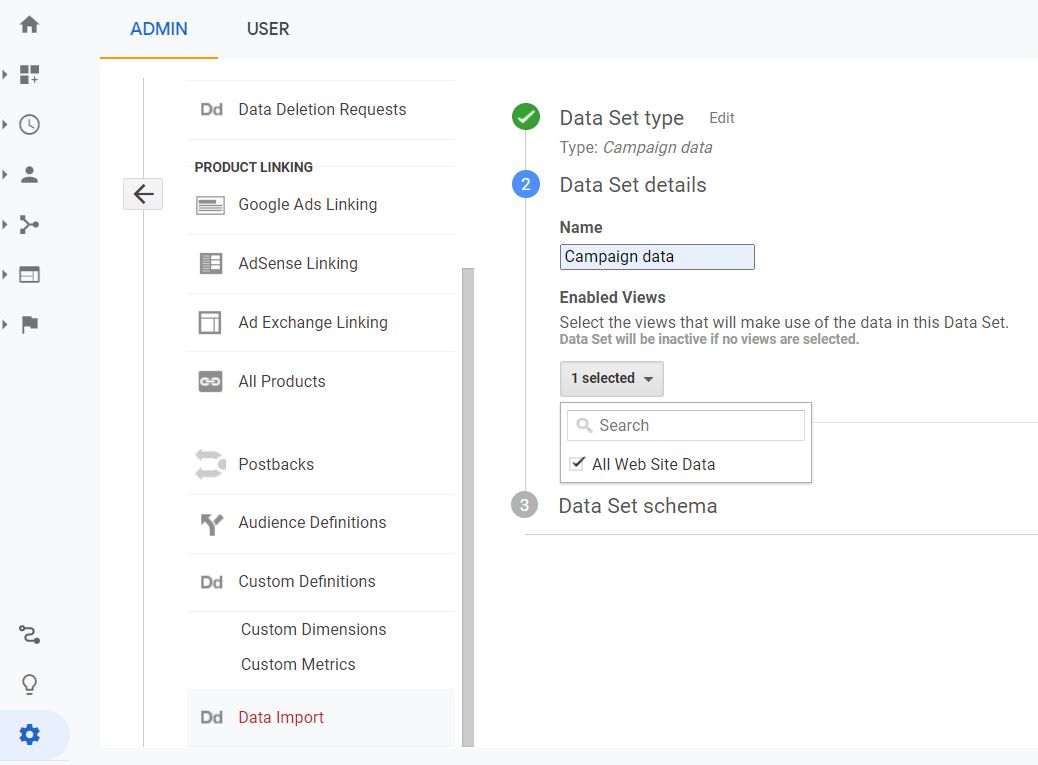
Under Data Set Details, give a name to your Data Set and select a View to connect it to. Click Continue.
-
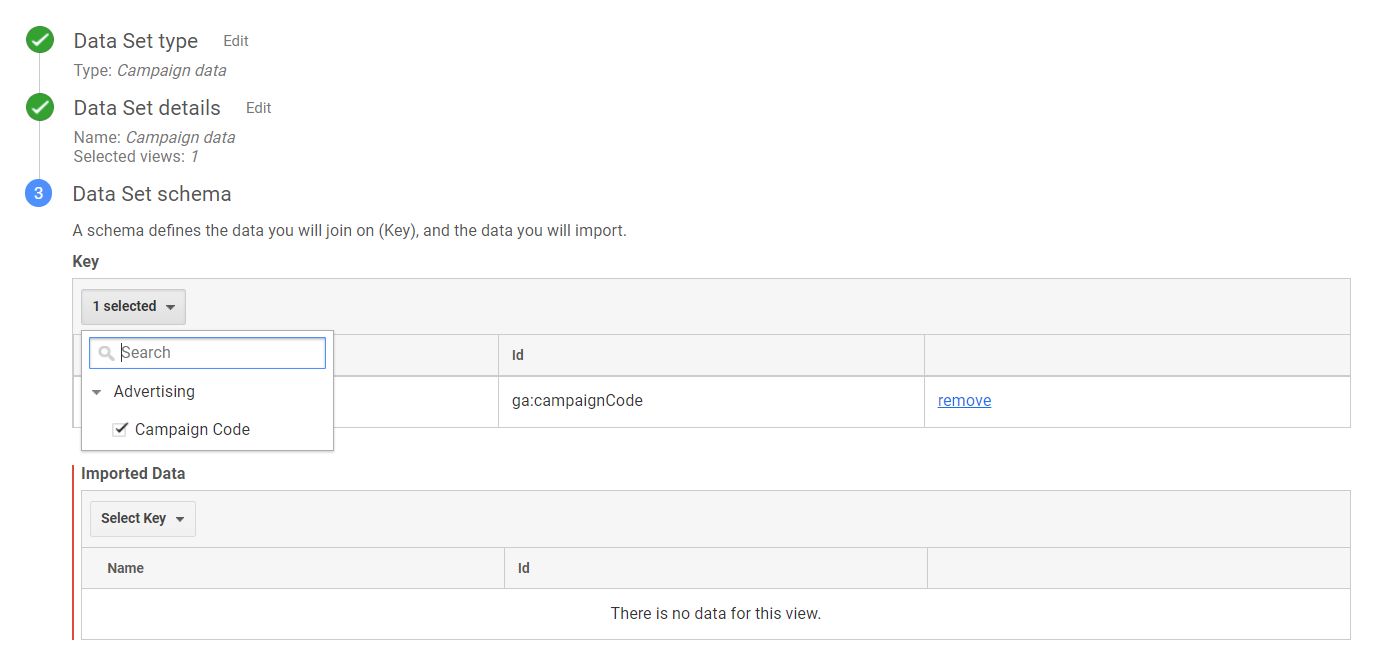
Under Data set schema, select ‘Campaign Code’ under the Key.
-
Under the Imported Data table, select the standard dimensions and also the Custom Dimensions you added earlier.
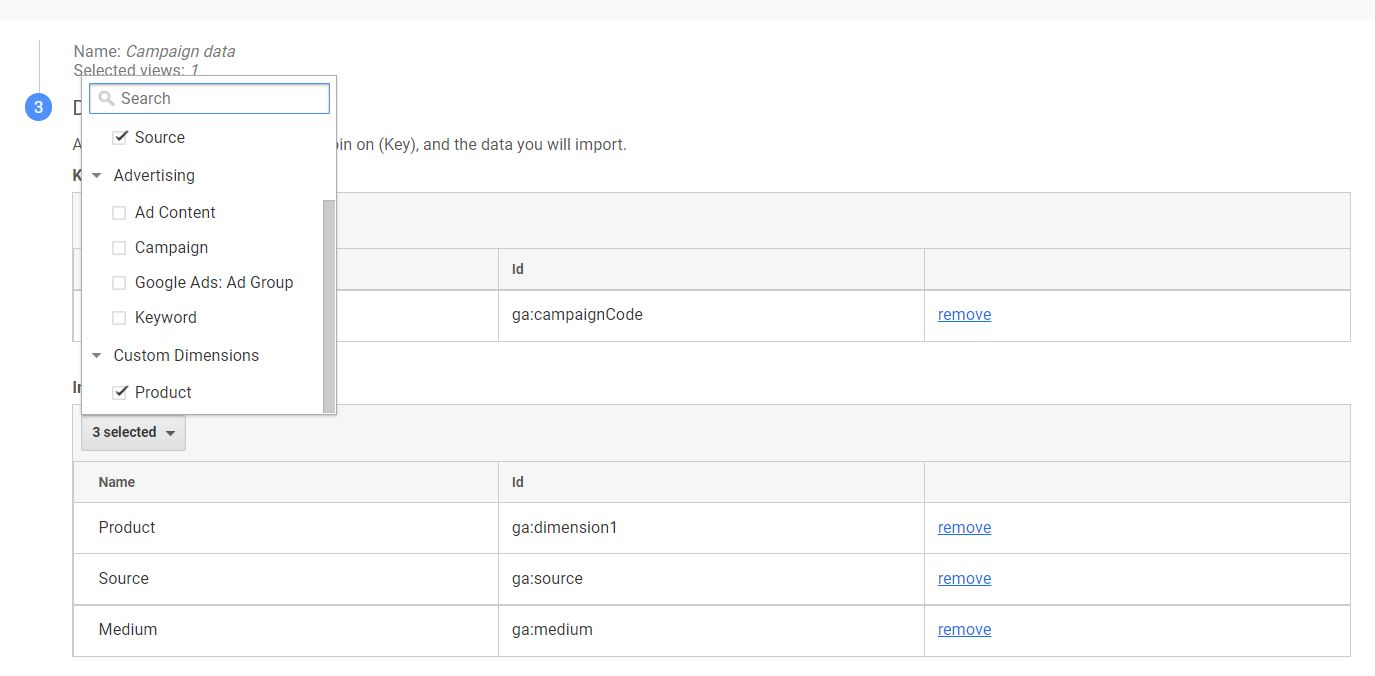
- Select Yes under Overwrite Hit data, which means that when both imported data and hit data are available, the imported data would be used.
- Click Save
Step 4 – Creating CSV file for data upload
You have to upload a CSV file in the specific format that Google wants so that the Campaign IDs are matched to the specific parameter values.
Here’s how the CSV header looks like:
ga:campaignCode,ga:medium,ga:source,ga:referralPath,ga:adContent,ga:dimension1
You can also down the excel template and edit it before uploading it back to Google Analytics.
Step 5 – Uploading the CSV file
This CSV file can be uploaded using APIs or using the web interface, under Data Import Option in Admin.
Step 6 – Checking reports to optimize campaigns
It’s very important to keep a close eye on the campaign data, so that you can optimize your Return On Ad Spend (ROAS).
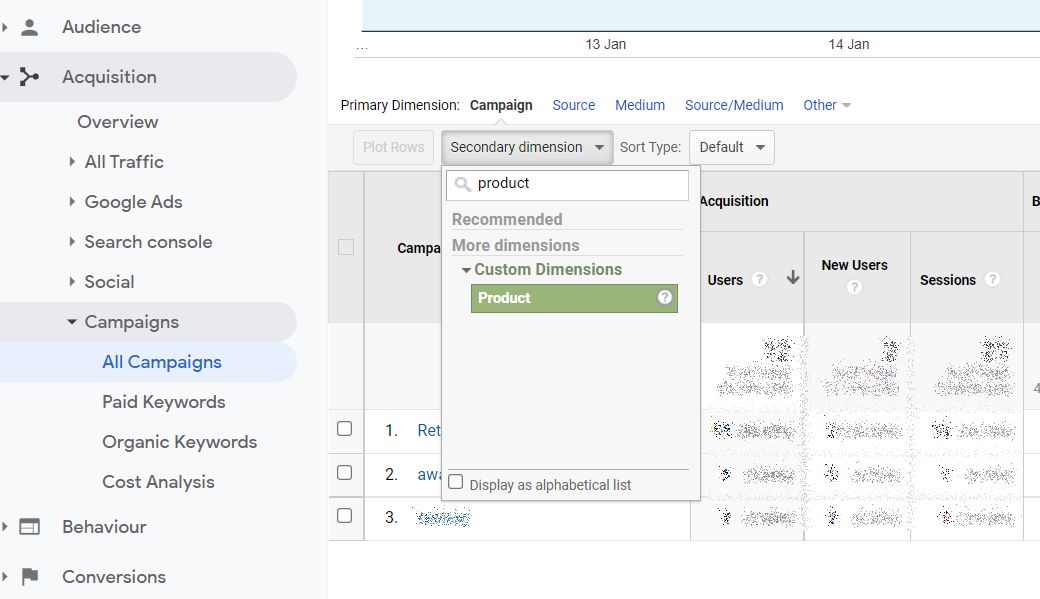
View Campaign Reports under Acquisition -> Campaigns in Google Analytics standard reports for specific information about your campaigns. Select secondary dimension as the Custom Dimension you added earlier to get information on that specific parameter.
How CampTag can help with implementing UTM_ID for you paid marketing campaigns?
We have helped our customers implement standardized marketing taxonomy and URL tagging to ensure better data collection and campaign analytics. Our advanced campaign tagging tool can help you implement UTM_ID for Google Ads with ease and precision. Reach out to us today to go beyond the ‘5 standard UTM parameters.’