Step-by-step guide to setting up a Google Ads campaign
Step-by-step guide to setting up a Google Analytics campaign, the right way, so that you get maximum returns on your ad spend.
Many of us have noticed with alarm, the way Google Ads became more expensive over the years as it moved from Google Adwords to Google Ads, and gained more features.
But it is still the most used and most valued Marketing campaign platform, because of the sheer volume of traffic that Google generates each day. With over 7 billion searches per day and the numbers growing each year, Google Ads is still unquestionably the right place to reach your target audience.
Here’s how you can get started with Google Ads.
Step-by-step guide to setting up your Google Ads campaign
Whether you are a seasoned marketer on Google ads, or new to the platform, this article will help you set up your ads just right, so that you earn maximum ROI on your Google Ads spent or ROAS(Return on Ad Spend).
Step 1 - Go to ads.google.com
If you examine the URL, you will find that you get redirected to a country-specific page, if one exists.
In case you already have a Google account, you can Sign in. Else, click on Get Started button on the top right to create a Google account. While creating the account, there are options like ‘For myself, For my child, To manage my business’.
Enter your First name, Last name, Email address (You can also create a new Gmail account if you don’t have one already)
Confirm your email id by entering the verification code sent to you. Enter your date of birth and gender in the next screen.
Agree to Privacy and Terms, and your Google account is all set.
You will be prompted to create your Google Ads account at this point. Follow the steps to setting up your first campaign.
Step 2 – Login to your Google Ads account
If you have already completed the above steps, or if you already have a Google Ads account, Login to it.
If you have multiple accounts, you have to choose the account you want to work with right at the Login stage. Google Ads has now introduced a 2-step verification which will be made mandatory after November 4th, 2021.
A toggle button on the right gives you the option to switch between Summary view and Detailed view.
Step 3 – Setting up your campaign
Go to Campaigns, and click on ‘New campaign’
Select a Goal and Campaign type that would be connected to your Goal.
You can also choose how you would achieve your goals, using website, phone call, store visits or app downloads.
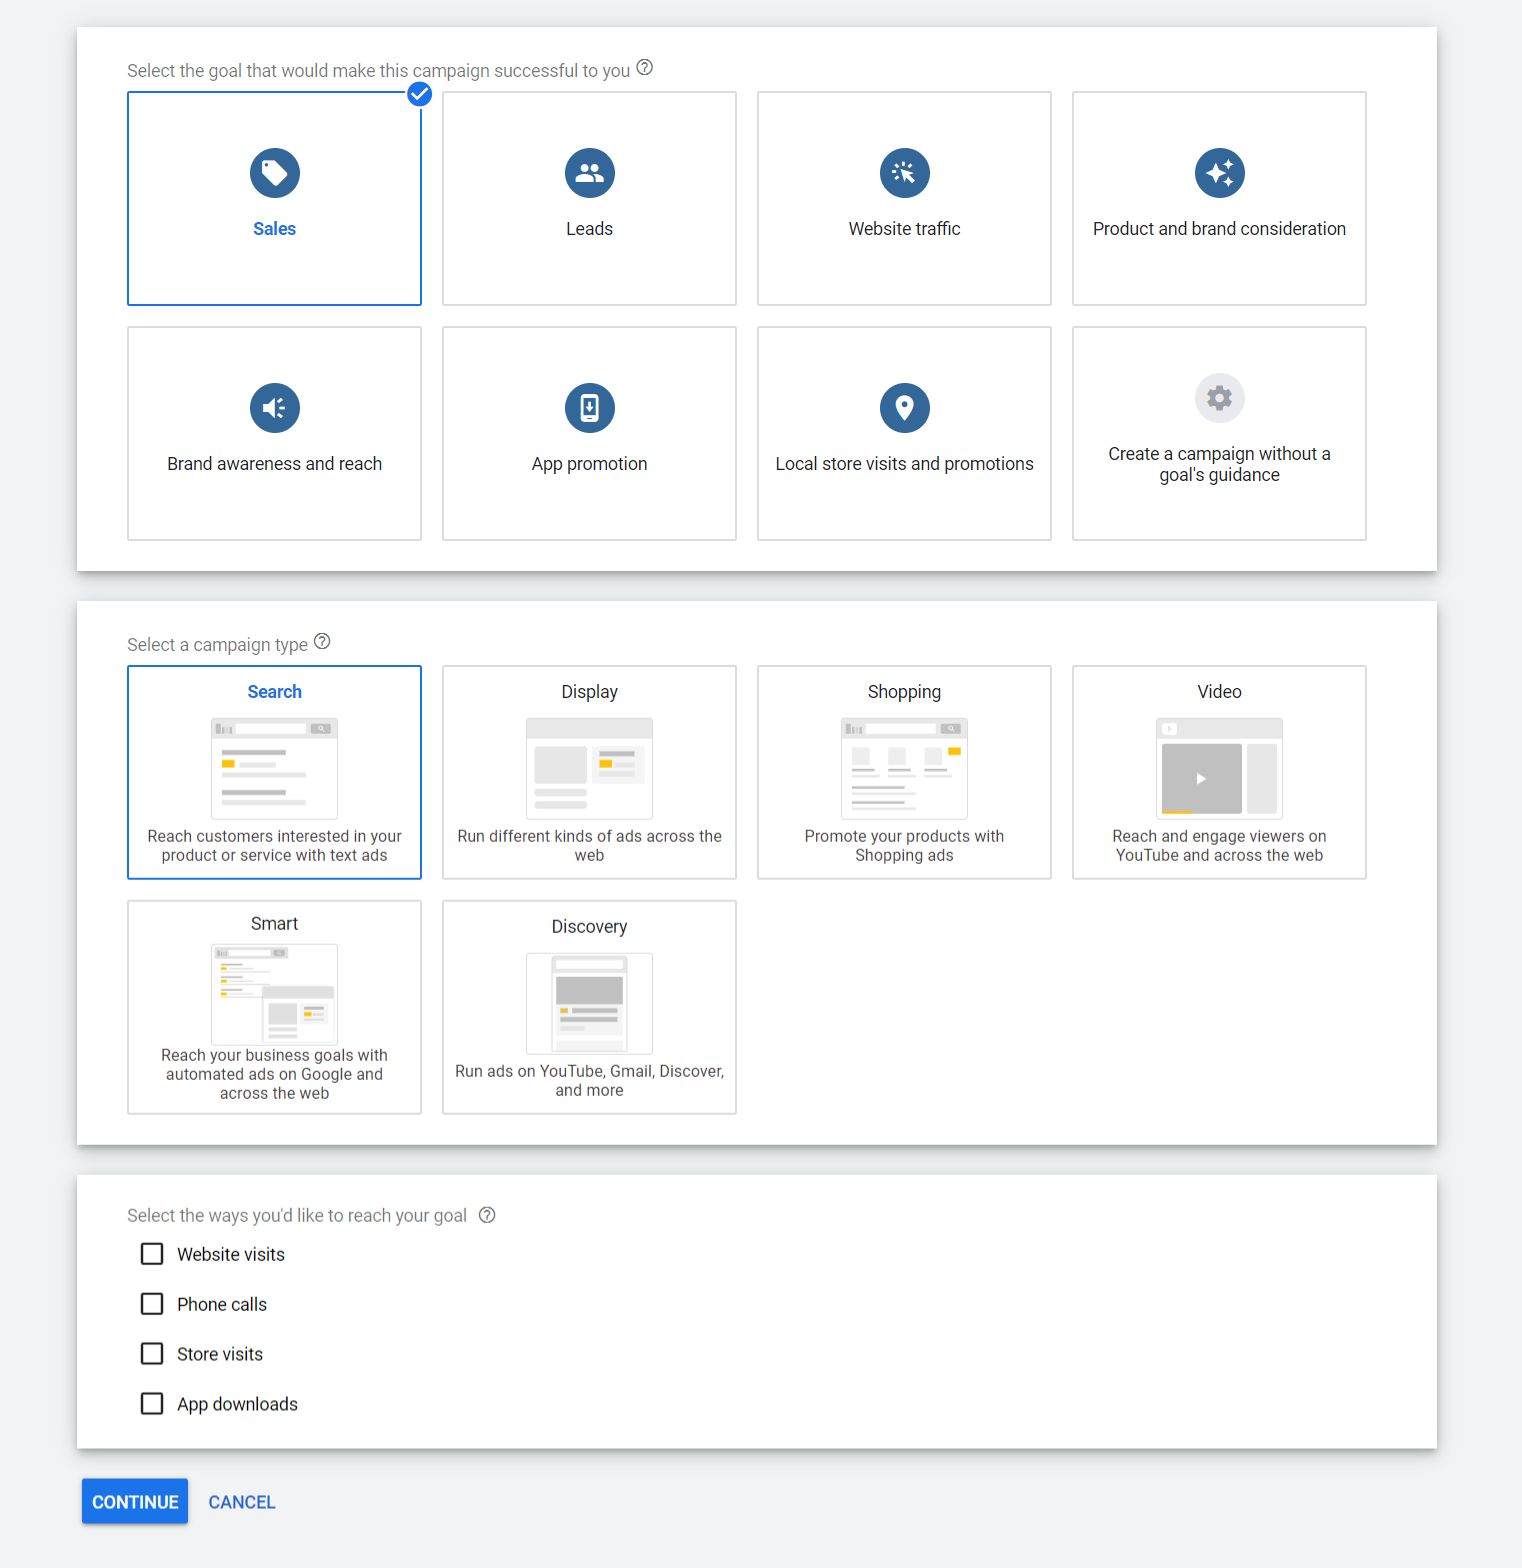
As you would have already seen, the options for campaign type changes with each option you choose. Here, I have chosen Sales as my goal, Search as my campaign type and Website visits as the method to reach my goal.
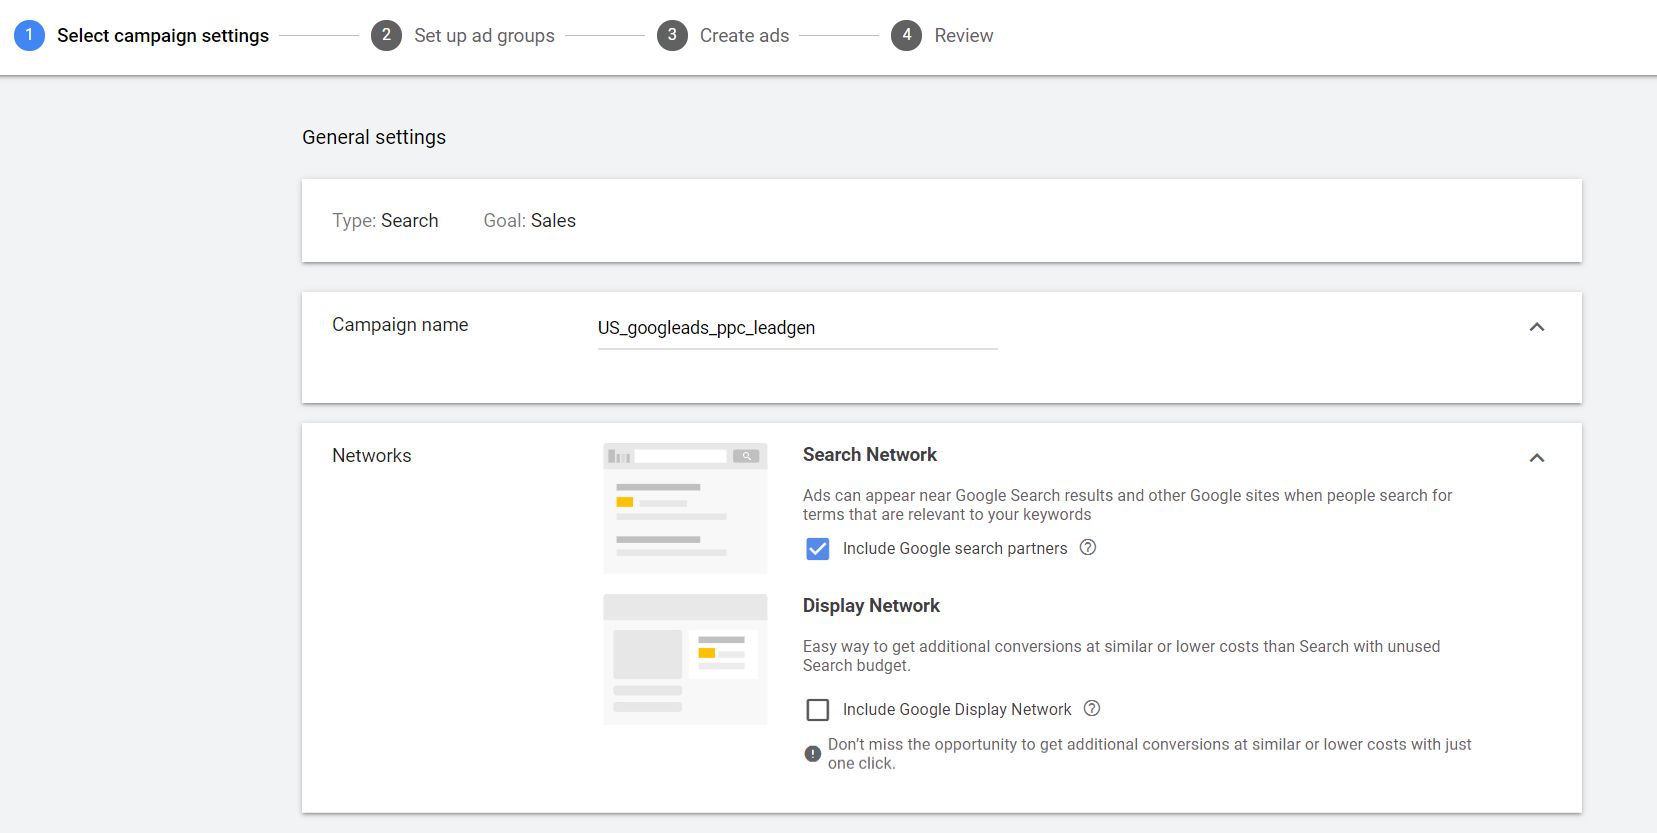
Step 4: Choosing campaign name, ad schedule
The next page on Google Ads is where you specify a bunch of details for you campaign including:
- Campaign name
-
Make sure you give a descriptive campaign name that will help you understand more about your campaign during analysis of data. Most marketers do not realize the importance of campaign taxonomy or standard naming conventions. Non-standardized, haphazard names like Banner4 or Leadgen-US5 can later cause confusion while gathering campaign information.
- Networks
-
You can choose the Search network only, or a combination of search and display networks, wherein Google ads will allocate your unused search budget to display ads automatically.
- Start and end dates
-
Remember that all settings are at a campaign level here. Any condition you specify here will apply to all your ad groups under this campaign. Choose the start and end dates for your campaign. It’s better to keep the end date open since that gives you the freedom to pause your campaign at any time.
- Tracking template
-
You can specify URL parameters at a campaign level here, including custom parameters and values for them.
You can read more about tracking templates and how to set them up here.
- Dynamic search ads setting
-
This is an auto-pilot mode wherein you allow Google Ads to create your ads, choose keywords, write appropriate ads and set your audience targeting. Your campaign and ad groups will be dynamically created.
- Ad schedule
-
This step is very important since you can define the time that you want your ads to show. The time shown here is the time that’s set in your Google ads account. Keep that in mind while choosing the days and time for your ads to run.
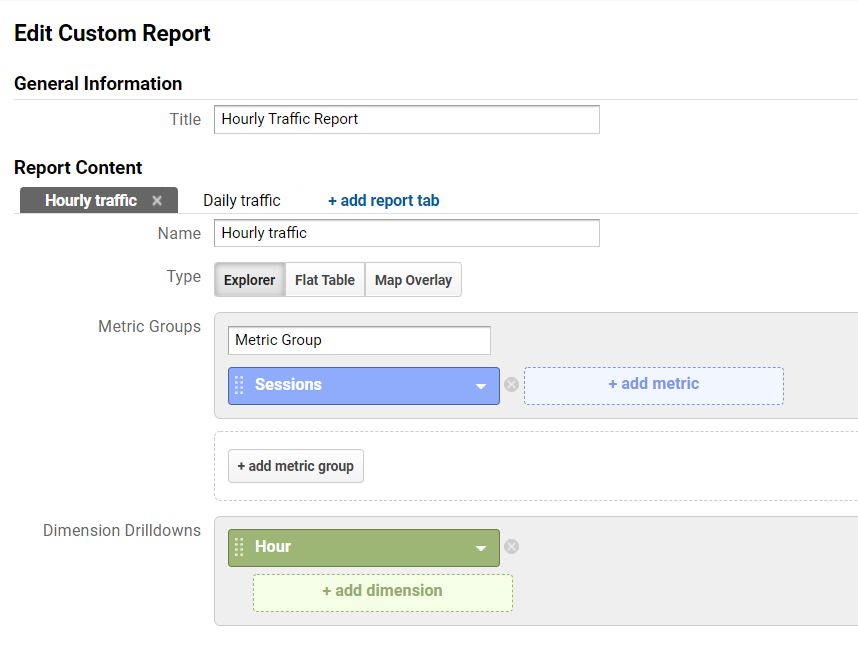
Choose weekdays or weekends depending on when your customers are most active. Also choose the time of day when your customers are most likely to visit your website.
You could figure out day and hour by creating custom reports in Google analytics.
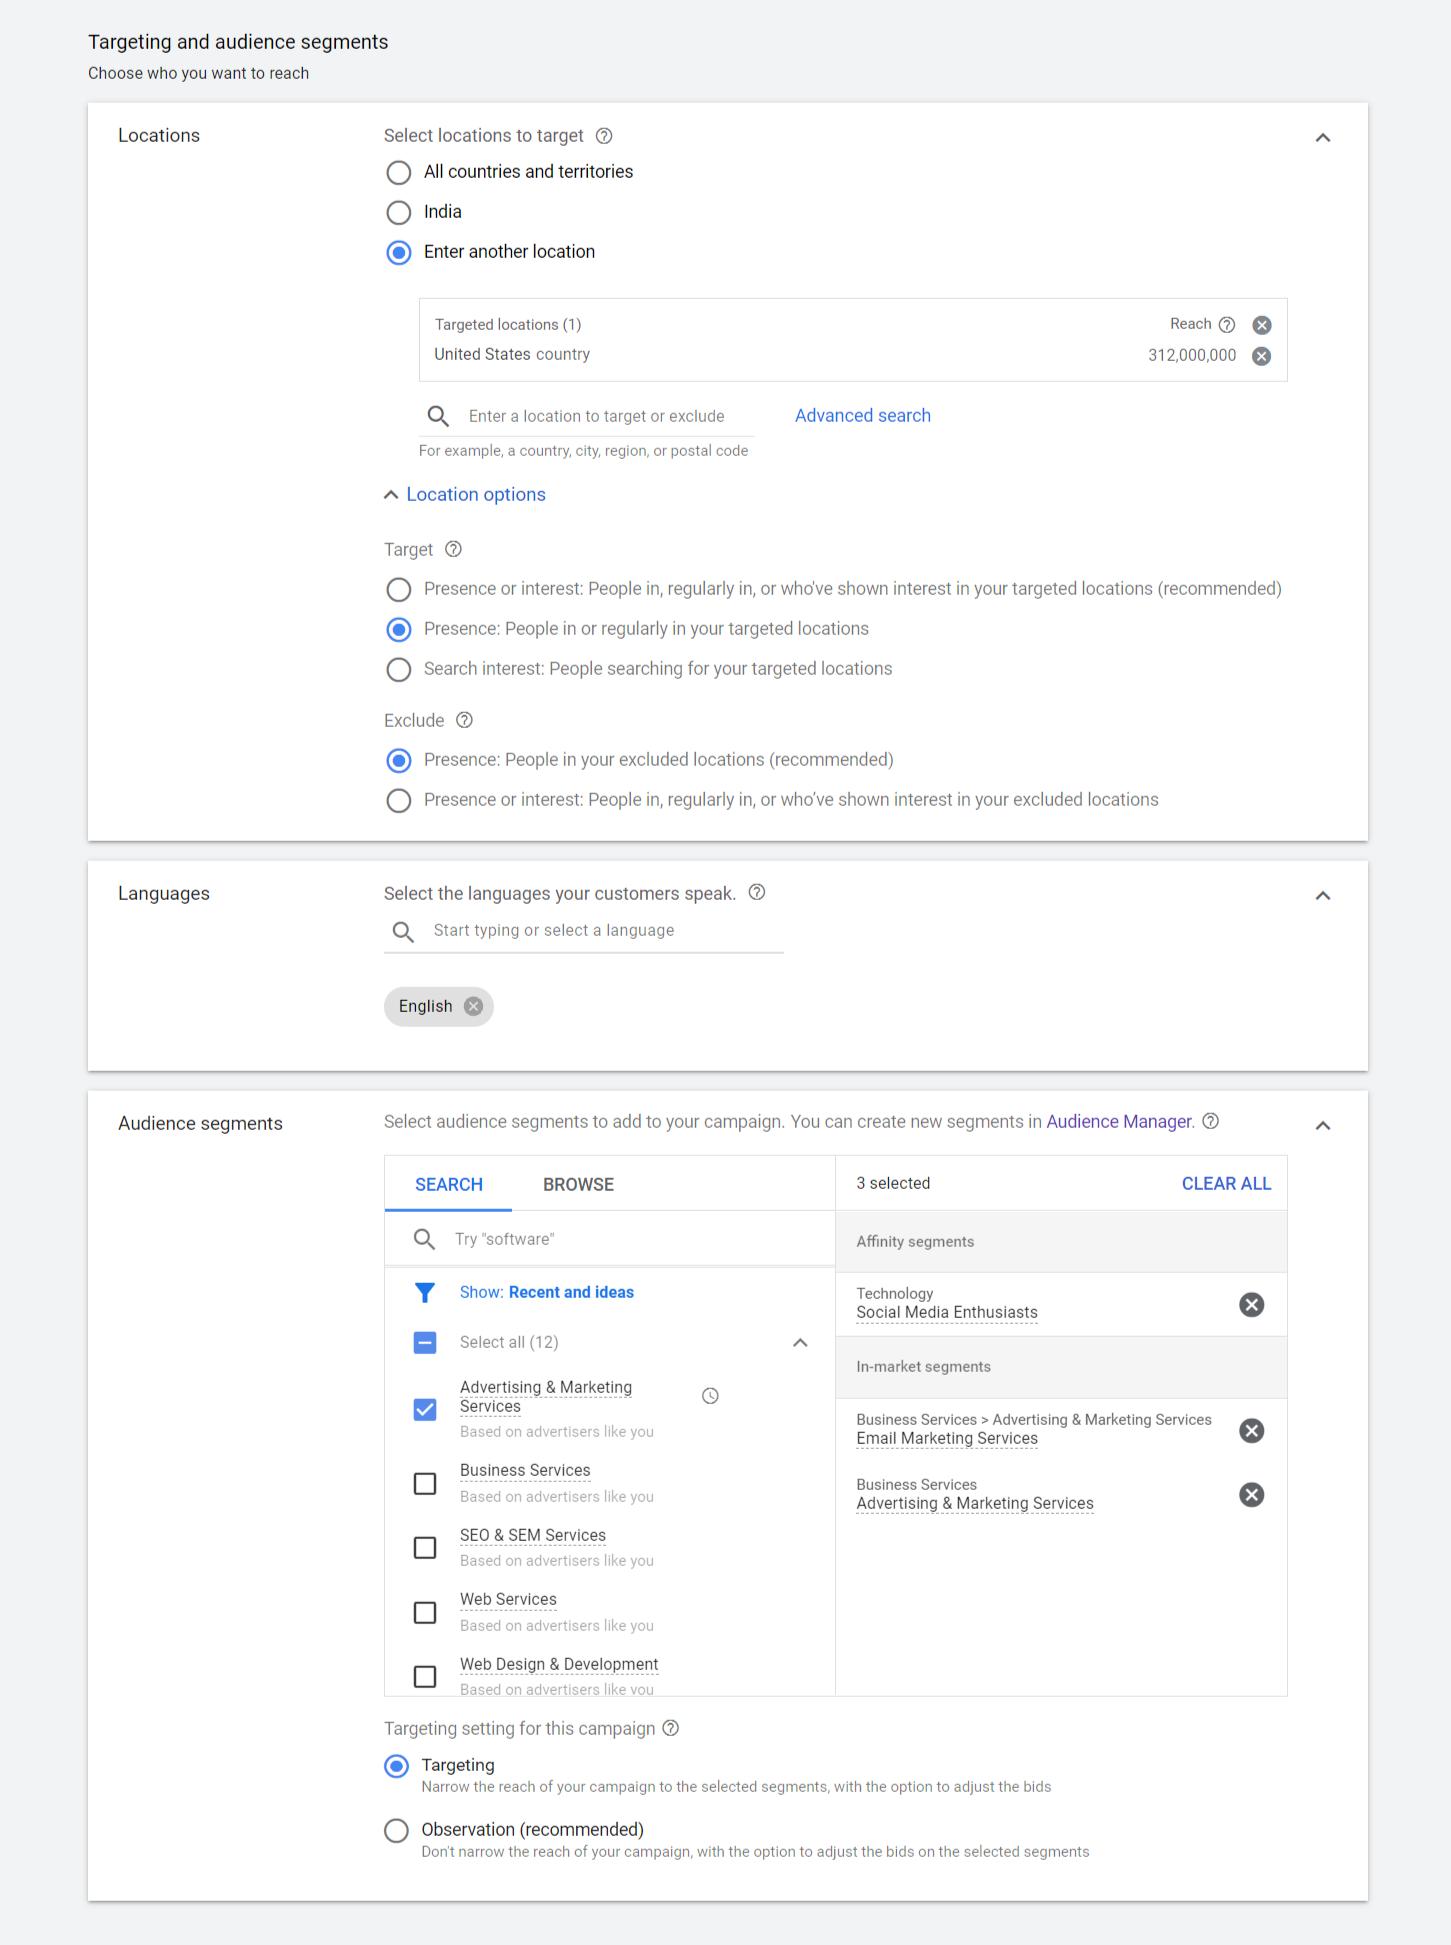
Step 5 – Setting your target audience
Under Targeting and Audience segments, you can choose countries you want to target, languages, and audience segments.
Google ads will suggest some audience segments based on your website content. You can also search for segments on your own, or define your audience segments in Audience Manager.
You can pinpoint your target audience using their affinity, what they search for (in-market segments), those who have already visited your website and more.
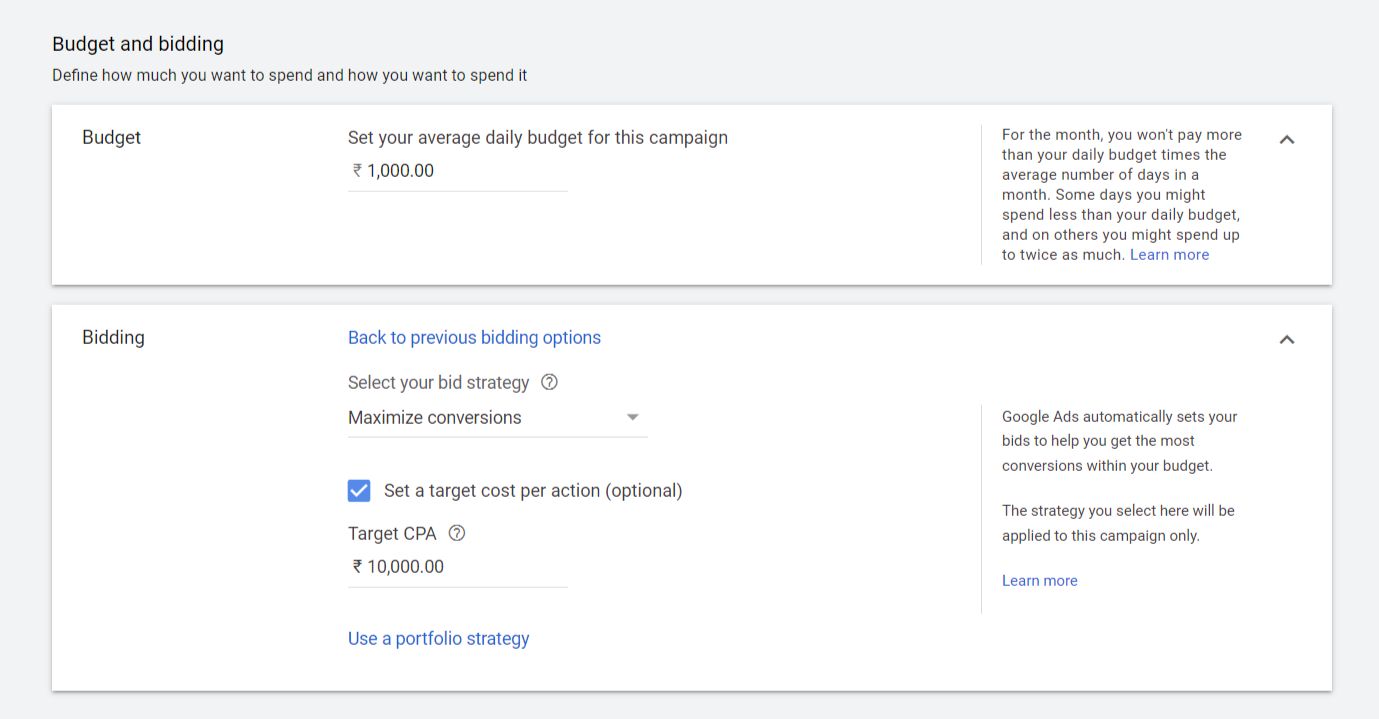
Step 6 – Budget and Bidding
This option allows you to set you daily targets, and bidding strategy. You can also define a cost per goal, so that you can get data on ROI for your campaign. This would be an average customer value or project value.
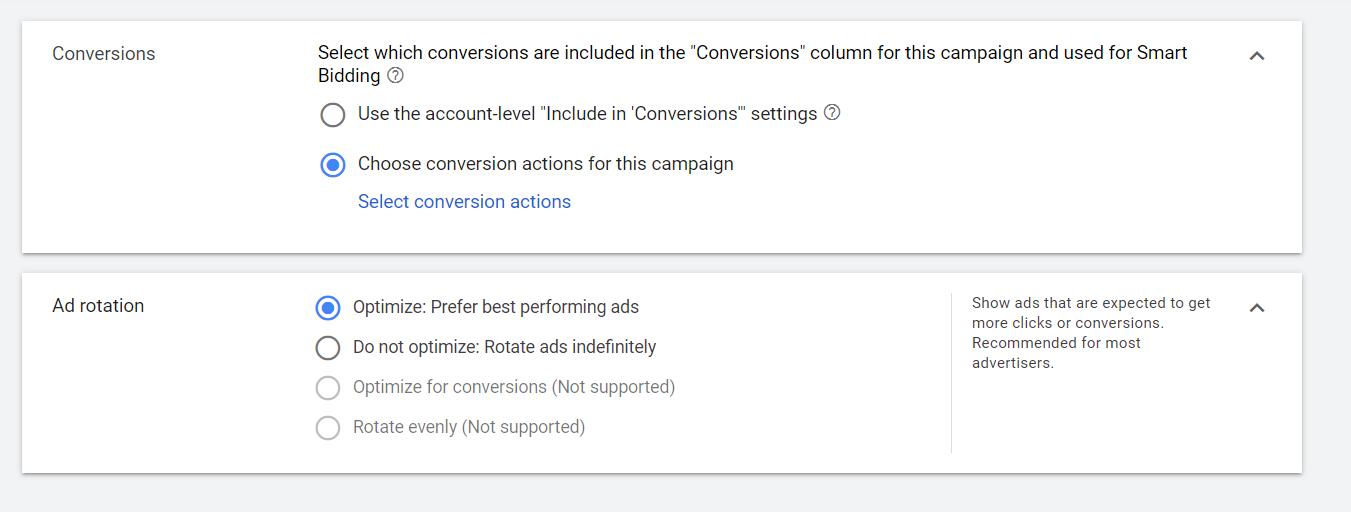
Step 7 – Conversions and ad rotation
Conversions can be set up at an account level for your entire website, or specific goals can be chosen for a particular campaign.
Ad rotation can be chosen to allow Google Ads to choose your best performing ad automatically.
You can pinpoint your target audience using their affinity, what they search for (in-market segments), those who have already visited your website and more.
Step 8 – Ad extensions
Ad extensions allow you to choose
- Sitelink extensions – 4 additional links to key pages on your website
- Callout extensions – Important differentiators like USPs, discounts, special offers
- Call extensions – Show phone numbers, and even specify the timings during which this call extension should show.
Step 9 – Setting up Ad groups and adding keywords
Give an appropriate ad group name to help you differentiate between multiple ad groups. Marketing taxonomy is essential here as well, to have standard ad groups names.
Keywords you can use in the campaign will be suggested by Google Ads based on your website content, and products/services. You could use them, or find you own set of keywords. Research more using Google keyword planner, SEMrush, Ubersuggest or Google Trends to arrive at a larger list of keywords you could advertise for.
Match type for your keywords is also specified at this time, depending on how focused you want to be, in your audience targeting. Exact match will keep your budget down, but might not get you enough audience. It’s better to try out Phrase match or Exact match for couple of days to see if you are getting enough audience.
keyword = Broad match
"keyword" = Phrase match
[keyword] = Exact match
Step 10 – Create your ads
This is a very important part of your Google ads set up since your headings and text is what makes a visitor click on your ad. Make sure you include your primary keywords, USPs and offer clearly and comprehensively in the ad.
Google ads now gives you the option to enter up to 15 headlines of 30 characters from which they will display the best option. And 4 descriptions of up to 90 characters.
You could add URL tracking parameters at an ad group level as well. Preview your campaigns in desktop and mobile. And approve.
Review your campaign and you are ready to reap benefits from your Google Ads spend.
Camptag can help you with Marketing Taxonomy as well as URL building, so that your data is captured correctly and sent to Google analytics, Adobe analytics or other Clickstream tools, for accurate campaign analysis. Reach out to us today.